|
[?]Subscribe To This Site
|
Framing a House
Framing a house or the house framing trade is the most difficult which explains why it takes the longest to complete. Framing is also the most costly of all residential construction trades. In fact the framing labor and material for wooden frame houses covers approximately 25% of the total home construction cost. If you are a diyer home builder, it’s not a bad idea to look into learning house framing instructions so you can learn how to frame a house in order for you to save. The first step in any house framing is to chalkline the location of exterior walls. This first step is critical because this is where the foundations and anchor bolts are verified if they were installed correctly or reasonably acceptable.One of the most important responsibilities of a house framer is to make sure the walls are square. This should be done before walls or any floor joist is installed. The term square in construction framing means that at wall intersections form right angle or 90 degree with each other.
Early framing layout is where errors (if any) from concrete foundation work are corrected. The sooner these errors are discovered and make necessary adjustments to the framing the better it will be for the rest of the project. An off square framing will be disastrous for such items as cabinets, countertop, shower, bathtub, door, furniture, etc. Since these items are premade based on right angle corners, it will be extreme costly to special order them if framing is not square. Framers use the 3-4-5 triangle to check square corners. Remember high school geometry? Well, you get to see a real life application of the Pythagoras theorem and hypotenuse.

Figure 45 above represents the 3-4-5 triangle where letters a&b correspond to the sides 3&4. The number 5 represent the hypotenuse or the letter c in the triangle. The unit of the numbers do not matter whether you use feet, inches, meters or centimeters as long as you remain consistent i.e if you feet stay with feet, you can't use one side a in feet and side b in inches. One thing nice about 3-4-5 triangle is you work with whole numbers versus 7-10-12.2 which require a calculator to do. Should you decide not to use the 3-4-5 triangle, you can use the formula for hypotenuse shown to calculate the length of c necessary for any wall to be squared.
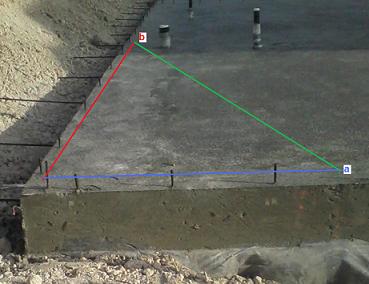
The photo below illustrates how in the process of framing a house you start by checking for exterior wall layout squareness. The red and blue lines represent the sides a&b while the green line represents the hypotenuse.
You start by picking one corner of the building as your starting point. Measure 15 feet going in the red line direction and 20 feet in the blue line direction. From those two points, measure the hypotenuse which is the green line in the photo. Suppose the measurement is off by one inch, in Before you snap any line with chalkline make sure all the walls are verified first. This is an important point because if you find one or two of the walls to be "off" mark, you might have to make adjustments to all of the walls in order to come up with a "happy medium" to make the "off walls" more manageable. If you snap the line prematurely, you run in to the risk of making adjustments, erasing, and redrawn lines can cause confusion. Once you get all the exterior wall layouts verified, it is time to start the next step in framing a house by moving on to frame individual wall which need to be done on level surface before lifting it to its final location on the layout. Learn about framing a window which is an important step in constructing walls. As you install walls, make sure to install braces to keep the wall level and upright. Also check out wall framing to learn about the importance of shear wall and shear wall nailing as well as shear panel application when space if limited. You can also go to load bearing wall and here to learn about bearing wall. All of these are preparation for roof framing. Back to framing a house |
|


 It will be ideal to use the entire wall length as sides but if you don’t have a long enough tape measure, you can use multiple of the 3-4-5. For example if you use a factor of 5 meaning you multiply everything by 5 the triangle becomes 15-20-25 which is within the limit of a 25 feet tape measure. Always remember the longer the two points, the more accurate it will be.