|
[?]Subscribe To This Site
|
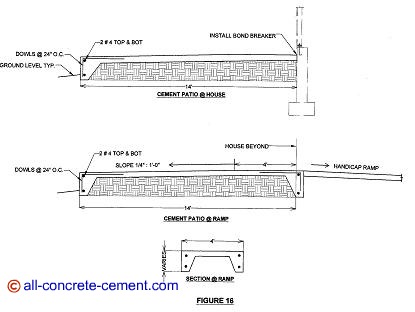
Cement Patio Prep TipsPrepping elevated cement patio can be tricky and costly if you don’t do it right. Whether a contractor or diy concrete patio, the procedures provided here will be very useful. Are you looking for great ideas how to turn your concrete patio into a shed, garage, or carport click here The thought process in concrete patio designs is discussed in Concrete Patio Design.These procedures are necessary steps to follow while preparing to pour elevated concrete patios. These steps are specific for the elevated patio shown on figure 15 but it also can be used for any elevated slab if poured monolithic with thicken edged slabs as shown on figure 16. Step 1: Remove Biodegradable Materials At first before doing anything remove the grass, top soil, landscaping, and all biodegradable material from the footprint of the patio. As shown on plans figure 15, this patio is added to a new house addition. In order to avoid any damage to the patio during the house addition construction, do not start the patio work until after the framing is completed.
The areas of the ground that were disturbed by footing and foundations excavation must be at least 95% compacted. To do this step effectively the footprint of the patio need to be layout and spray painted on the ground, roughly a foot more than the actual layout. By doing this step upfront, the risk of burying these materials below the slab is eliminated. Over time once these materials are decayed, it will cause slab settlement and cracking.
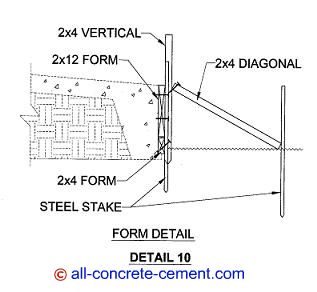
Step 2: Forming Since the top of the concrete patio is about 16” above ground level, one row 2x12 on top of a row of 2x4 should be sufficient for forming. This arrangement is shown on detail 10. It is a good idea for the patio to be perpendicular to the house. Refer to [insert cement driveway] as it describes in detail how to go about squaring the patio.
The 2x4 diagonal also called a kicker. Its function is to prevent the top of the form from buckling due to the weight of the concrete. The kicker is most effective when it creates 45 degrees with ground level. The diagonal and vertical 2x4 should be spaced every 5 feet. When it comes to forming concrete, it is best to overkill. There is one chance to do it right or it will cost a lot of pain, headaches, and most of all money if the form fail during the pour.Step 3: Fill and Compaction The forming in step 2 should be done to 3 sides, leaving one side or a portion for equipment such as bobcat to move the fill material in and to do the compactions. Pea gravel is a good option as fill material in this case because it minimizes compaction. Step 4: Close the form Once backfilling and compactions are done, go back to step 2 and closeout the areas left open for step 3. Back to Cement Patio Learn about Concrete Patio Designs Check out this link for excellent ideas how to turn your concrete patio to a shed, garage, or carport. Back to Home Page |
|


 Per detail 10 the steel stake against the 2x12 forms are responsible for alignment and elevation of the slab. The vertical 2x4 must be driven into the ground to prevent the bottom from pushing outward. If the 2x can’t be driven into the ground, use a steel stake and drive it into the ground to hold the vertical 2x4 in place.