|
[?]Subscribe To This Site
|
Calculation Roof TrussesCalculation roof trusses are tedious and very time consuming process but necessary to determine the forces required for truss roof construction. If you are planning to build your own roof truss or setup a simple roof truss calculation here are steps that will help in determining the type of truss members before constructing and install roof trusses. The first step in roof truss design is determine the loads that the trusses are going to be subjected to. The procedures shown here are intended for the wood truss diagram shown below. Considering that roof trusses are normally spaced at 24 inches on center, here are the load calculations: Roof Dead Load: The truss top chords, bottom chords, and webs are of 2x4 that weighs about 1.2 lbs/ft. Adding up all the truss members comes out to a total length of 47.5 ft – truss weight = 1.2x47.5 = 57 pounds. Converting to psf, take 57 divide by 17.5 feet truss span times 2 feet on center yields 1.6 psf (57/17.5x2). Next is the roof sheathing, in this case wafer, followed by roofing assumed to be roof shingles but it can be roof tiles whatever material desired by the owner or architect. The ceiling load is also a dead load that are attached the bottom chord of the truss. A half inch 4ft x 8ft drywall sheet weighs 54 pounds or 1.7 psf. wafer board = 1.4 psf Roof shingles = 2.4 psf Truss = 1.6 psf Ceiling = 1.7 psf Total DL = 7.1 psf Roof Live Load: Per code roofs need to be designed for minimum load of 20 psf. Even if you are in areas that are not affected by snow, roofs still need to be able to withstand maintenance crew and workers for roof installation. In areas affected by snow roofs are designed for snow Loads of 30 or 40 psf which are over the minimum design load. In this example use 20 psf live load. The total load = 20 + 7.1 = 27.1 psf times 2 ft on center = 54.2 plf
In this truss example, there are few assumptions made for the calculations to work. One assumption is the loads are applied at the truss joints. The joint connections are assumed to be pin connected meaning there is no moments transferred in the joints. Wind load is one of the most devastating forces that need to be considered in the calculation roof trusses. The wind damages are caused by suction or uplift that are pointed outward or upward. During a wind storm, it the live load are very negligible, so the live load are not going to be a factor. The only load that can counter the uplift due to wind load are the dead loads.
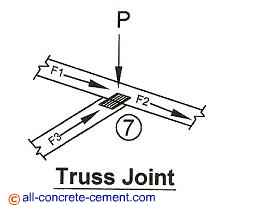
The truss joint shown here is an interpretation of how the loads are being applied at joint#7. Load P comes from the load calculations mentioned above. Go to build your own roof truss for continuation of the analysis. Back to calculation roof trusses From calculation roof trusses to all-concrete-cement.com Questions or CommentsWe welcome your Questions and/or Comments Other Visitors' QuestionsClick below to see responses to other visitors' questions...
ROOF TRUSS HEIGHT |
|


 The Simpson Strong Tie hurricane tie for trusses are intended to tie the trusses to the walls which are in turn anchored down to the foundations and footings. This is the only way to prevent the roofs and trusses from taking off during wind storms or hurricanes.