|
[?]Subscribe To This Site
|
Concrete Slab Construction
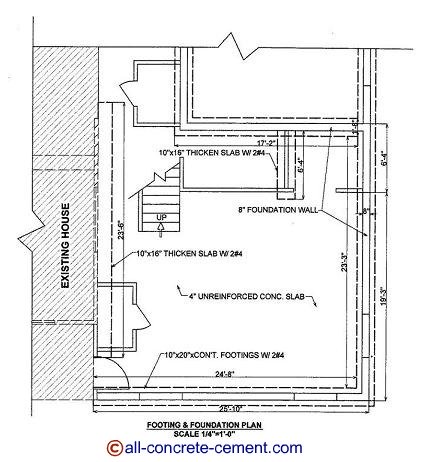
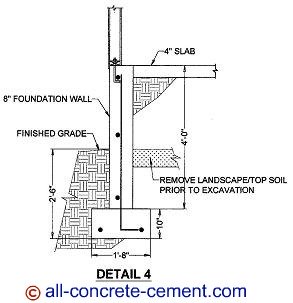
Concrete slab construction requires great deal of preparations prior to the actual pouring concrete slab which should be part of slab on grade design as well as concrete slab insulation if extreme hot and cold is to be considered in your area. At this stage, it is good practice to revisit the concrete slab cost estimate used during planning and budgeting stage. Concrete slab floor preparation usually comes after the footings and foundations are poured and back filling are done. The equipment needed to complete the concrete slab construction preparation depends such factors as the size of the project, type of soil, quantity of material to be brought in or haul away, etc. The procedures outlined here are based on the footing and foundation plan shown below and it can be applied to any slab construction. Detail 4 is a typical cut at the perimeter of the footing and it has the information needed to construct the slab.
Prior to excavating footings, it is very important to remove the grass and topsoil from the areas of the slab. If this is not done prior to footing excavations these materials will be covered up and likely to be buried below slab. These materials can cover up to 4 inches thick which will become void spaces after they all decayed. This has potentials to cause slab settlement which can be catastrophic to the floor finishes and everything else that the slabs support.
For concrete slab construction that are not supported by the ground refer to suspended concrete slab or suspended slab supported by metal deck. Here are the steps for concrete slab construction cast on grade: Step 1: Determine Backfill Material - concrete slab construction The dimension for the slab is 25’-2”x24’-3”, approximately 610 square feet. Per detail 4 after removing the landscape and top soil, we have about 1’-6” of structural fill to bring in. The best fill material is gravel about 1 inch diameter which can be bought from gravel supplier. You can get fill material for free from excavation companies, construction companies, or concrete contractors. If you see excavation in progress for basement or footing, ask for the dirt to be taken to your site, the excavator will save dumping fee while you get free material for fill. Free fill materials sometimes are mixed with trash or bio degradable material, so be careful. Big pieces of old concrete and rock 6 inches diameter or more are not good fill material because they will leave big voids between them when compacted. The amount of fill needed can be calculated by using this formula: L x w x h (L=length, w=width, h=height). Using the slab info above, total fill needed: 25.17'x24.25'x1.5' = 916 cubic feet, divide by 27 to convert to cubic yard yields 34 cubic yards. Since structural fill are sold in tonnage, total cubic yardage will be required by gravel supplier in order to determine the total tonnage.
Step 2: Backfill - concrete slab construction The equipment and tools needed for backfilling: compactor, wheelbarrow, level, and shovel. The backfilling for the slab in the example project will take 2 hours max if a bobcat is used. If done by hand with wheelbarrows, it may take two days or more. The first thing to fill and compacted are the voids left from footing excavation followed by the gap between the foundation walls and existing ground. This step will bring everything to the same level leaving 18 inches at the top to fill. An 18 inches fill needs to be done in two lifts, 9 inches per lift. Before spreading the fill, mark the first lift 9 inches above the existing ground at several locations of the foundation walls. These marks will guide spreading of the fill material. Spread the fill about 2 inches above the 9 inch mark. Run the compactor at the entire surface. Repeat the process for the final lift making sure to leave at least 4 inches for the slab. Step 3: Install plumbing & utilities At this stage, install all underground utilities such as floor drains, hookup for toilets, water lines, electrical & mechanical that required to be underground. Step 4: Request for inspection After all utilities are installed, request inspections by the city building department. Step 5: Re-backfill if necessaryIf any of the fill was disturbed during the installation of utilities, refill and re-compact. Do not run the compactor on top of buried pipes Step 6: Request footings inspection If there are interior footings to be poured monolithic with floor slabs request inspection by building department. This step can be done in step 4 as well but make sure to notify the building department and the inspector. There need to be a separate inspection report specifically for interior footing. Step 7: Once you pass inspections, you are ready to pour the slab Return to
Concrete Slab Construction
|
|


