|
[?]Subscribe To This Site
|
Build Your Own Roof TrussThe most important thing if you intend to build your own roof truss is to make sure the trusses don’t collapse. This page is a continuation of calculation roof trusses which we will discuss how the forces at the joints are calculated in order for a simple roof truss can be built safely. Most diy truss builder know how to build roof trusses but when it comes to actual designs to roof trusses as done by professional truss manufacturers, it is a huge challenge. Trusses are intended to span a long or wide area that cannot normally be done with a single piece of wood. By calculating the forces transferred at the joints, the truss builder will then be able to figure the type of joint materials necessary in order to safely transfer the load without collapsing.From the truss diagram shown below, the points where the truss sits on the wall are called reaction points. These points are where the load is being transferred from roof to the walls down to the foundations and footings. Some engineers require that double or even triple studs are installed at each reaction point. This is especially true if the loads are very heavy or the truss clear spans are very long in the range of 60 to 80 feet. This requirement is intended to transfer the load directly to the foundations below rather than the truss sitting on the double top plates of the walls. In most cases, this requirement is not needed a 16 inch stud spacings most often sufficient to carry the load.
To build your own roof truss, you must first calculate the reaction forces at joints 1 and 4. This can be accomplished by multiplying the total load of 54.2 plf (see details in
calculating roof trusses
for detail) by the truss clear span of 17’-10” yield 966.4 pounds (54.2 x 17.83 = 966.4). This load is assumed to be evenly distributed along the truss which means the reactions at joints 1 and 4 are equal to half of 966.4 which is 483.2 pounds.
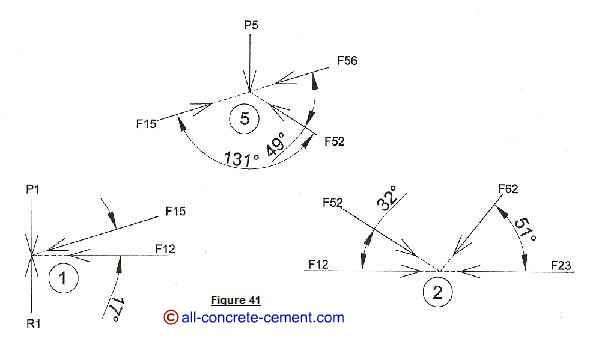
Once the reactions are determined, the next step in build your own roof truss process is to break down each joint as shown in figure 41. The forces in joint 1 include the reaction, external force P1 and forces from joints 1 to 5 and joint 1 to 2. There are two methods of truss analysis engineers use, the joint method that shown here and the section method where section of the truss are cut in order to determine the forces in each truss member. The arrow shown in figure 41 represents both the truss member and the force. The direction of the arrow is the assumed direction of the force. If during the calculation the force comes out negative, it means the assumed arrow should be reversed. Any force going into the joint means the truss member is in compression, any force directed away from the joint means the member is in tension. The external force P1 in joint 1 can be calculated using the 54.2 plf mentioned earlier. The horizontal distance from joint 1 to 5 is 4ft 9 inches so half of the load will go to joint 1, the other half will go to joint 5; 54.2 x (4.75/2) = 128.7 pounds.The two unknowns forces F12 and F15 can be determined by adding all the forces in the y and x directions to equal to zero because we want everything to be in static, no movement. Y direction: R1-P1-F15*Sine(17) = 0, F15 = (483.2-128.7)/sine 17 = 1212.5 pounds. Since the force is positive and the arrow in joint 1 points toward the joint, member F12 is in compression. X direction: -F12-F15*cosine(17) = 0, F12 = -1159.5 pounds. Since F12 is negative, F12 in joint 1 needs to be reversed to pointing away from the joint which means member F12 is in tension. This complete all the forces in joint 1. Joint 5 should be next for analysis. The reason joint 2 is not a good choice at this time because there are 3 unknowns there: F52, F62, F23 but there are only 2 equations we can work with. Once force F52 is determined from joint 5, we can than move to joint 2. Once the member forces are determined, you are now ready to move to the next step how to build roof trusses Back to build your own roof truss From build your own roof truss to all-concrete-cement.com Questions or CommentsWe welcome your Questions and/or Comments Other Visitors' QuestionsClick below to see responses to other visitors' questions...
Collapsing roof trusses |
|


